1. Finding the Pair tablet button
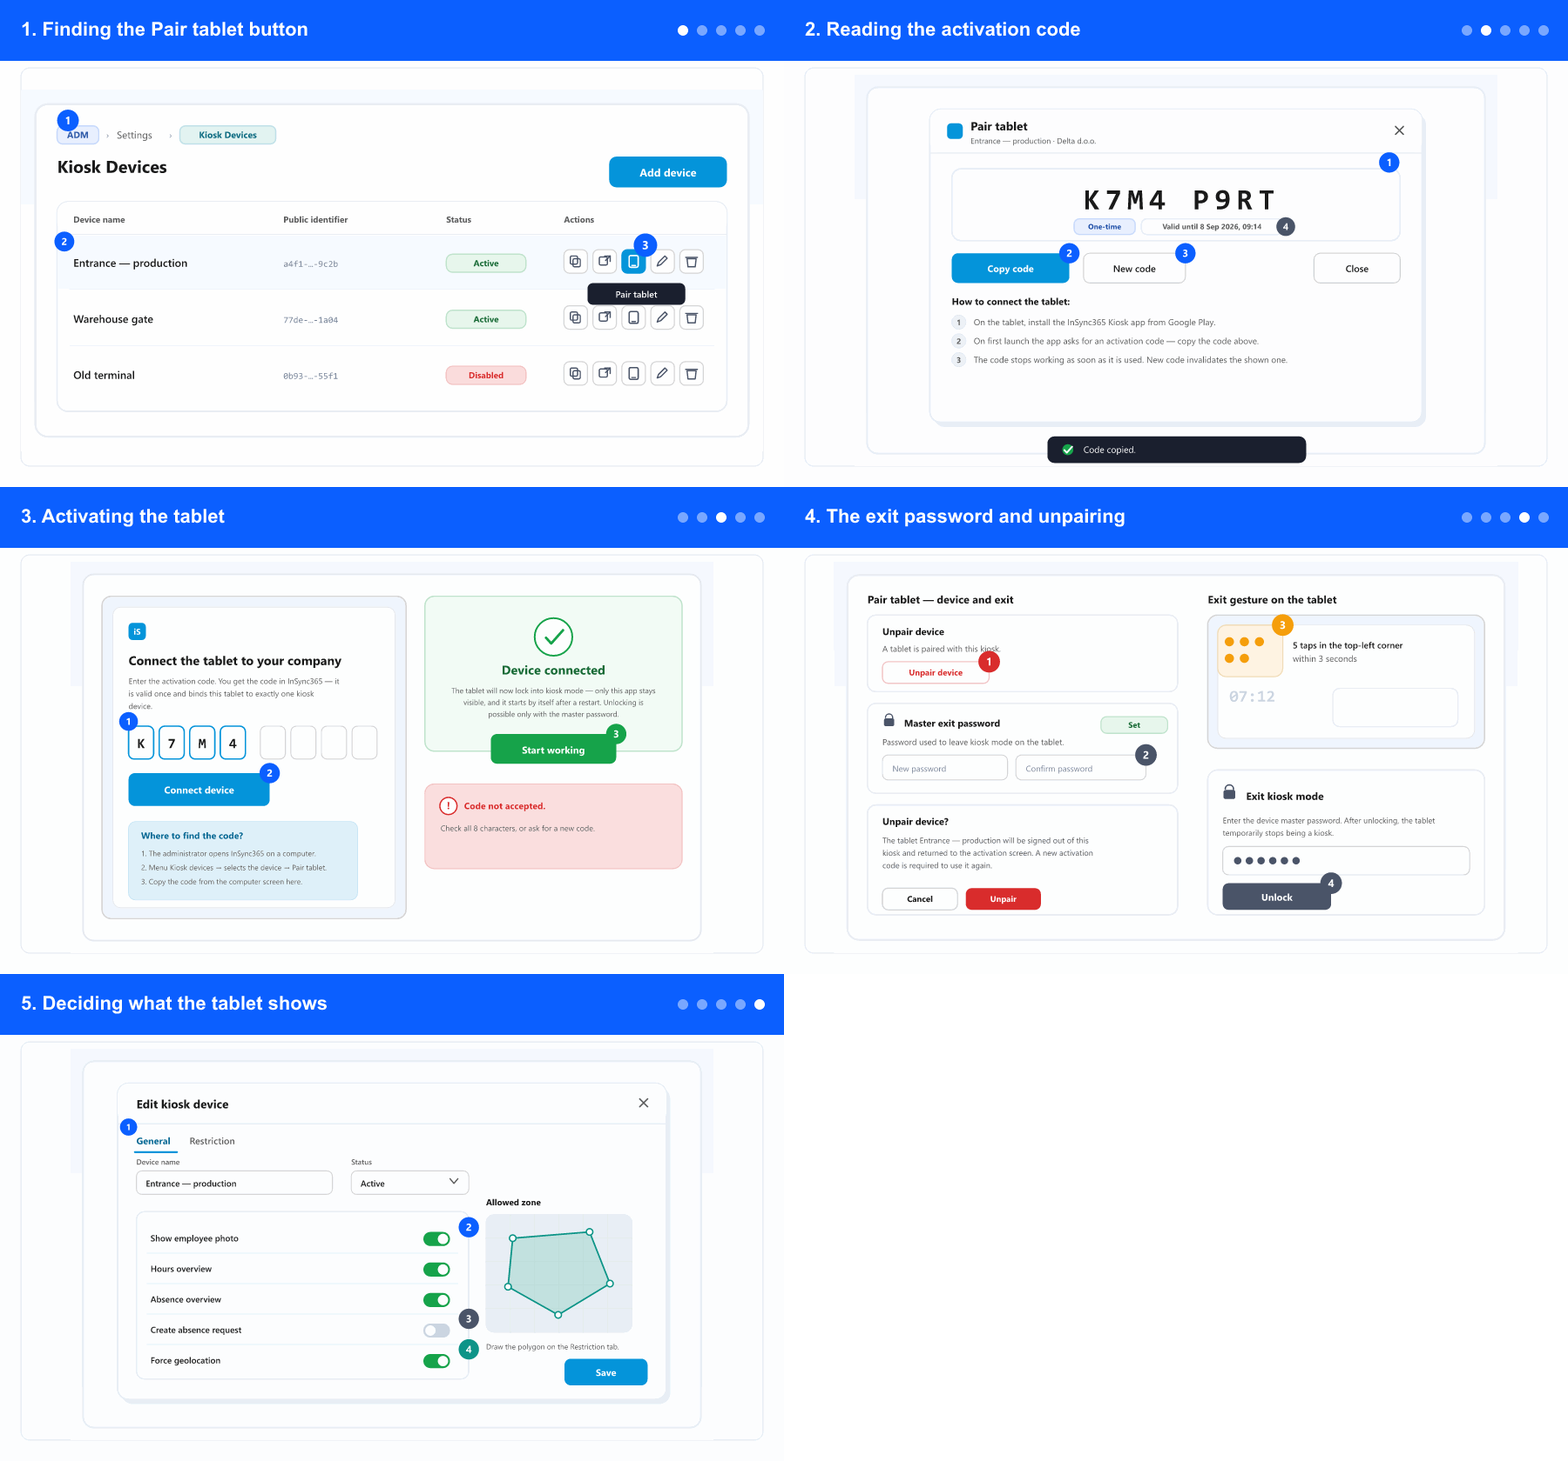
Open the “Kiosk Devices” screenopens in a new window · you need to be signed in
- In the left menu open the ADM tab (if the tab strip is shown), then Settings and inside it Kiosk Devices.
- Find the device this tablet will become. One device per physical screen, named after the place rather than the hardware — see Setting up a kiosk device if you still need to create it.
- In that row's action buttons, click the one with the tablet icon. Its tooltip reads Pair tablet. The same button is in the card footer when the list is shown as cards on a narrow screen.
- Do this on the computer, not on the tablet — you will read the code from this screen and type it on the tablet.
2. Reading the activation code
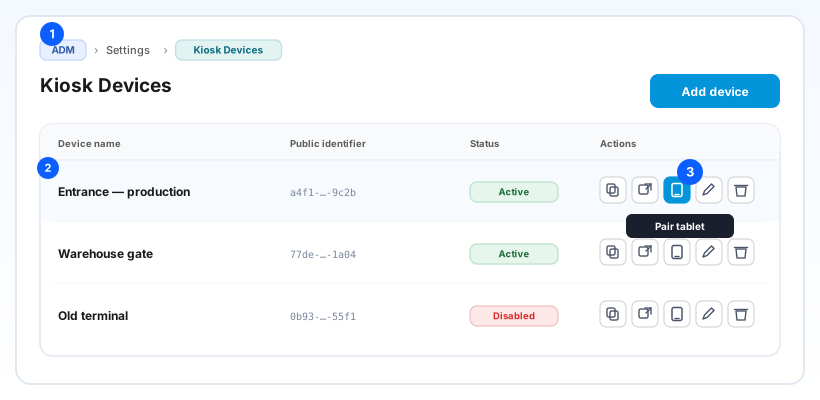
- The dialog opens with a code already there — eight characters, shown in two groups of four for easier reading. There is nothing to press first.
- Copy code puts it on the clipboard, which helps if you are sending it to a colleague who has the tablet. A confirmation reads Code copied.
- New code generates a fresh one. Use it if the code has expired or you are not sure who saw it — but note the message: the previously shown code stops working immediately.
- Next to the code you see that it is One-time and until when it is valid. It expires by itself, and it also stops working the moment a tablet uses it.
- Keep the code as you would a password for those few minutes. Anyone holding it and an Android tablet can pair a device to this kiosk.
- You can close the dialog and come back later; if the code is still valid, the same one is shown again.
3. Activating the tablet
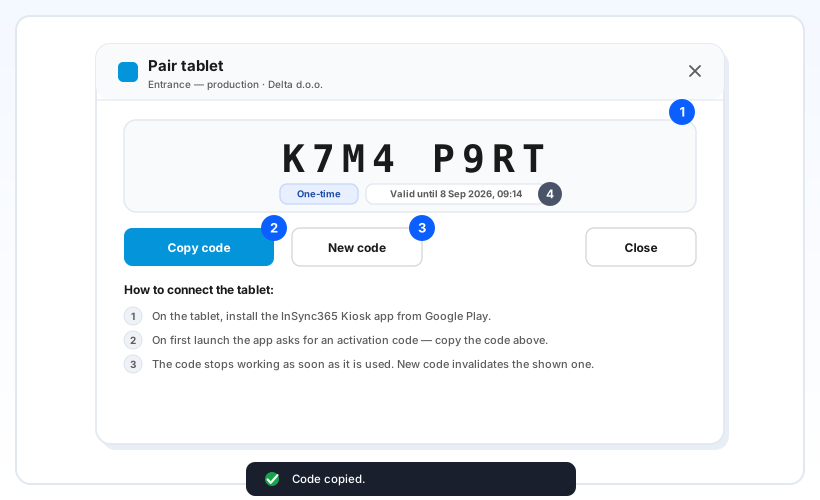
- On the tablet, install InSync365 Kiosk from Google Play and open it. Make sure the tablet is on Wi-Fi first — activation needs a connection.
- The app asks for the activation code and shows eight empty cells. Type the code; letters are entered as shown, and the app does not distinguish groups — the space in the middle is only for reading.
- Tap Connect device. The button stays unavailable until all eight characters are in.
- If the code is refused, the message is always the same: Code not accepted. Wrong, expired and already-used codes are deliberately not told apart. Check the characters, and if they are right, generate a New code on the computer.
- After too many attempts in a row the app asks you to wait a minute. That is a safety limit, not a fault — try again shortly.
- On success the tablet shows Device connected and names the company and device. Read that line: it is your check that the tablet is bound to the kiosk you meant.
- Tap Start working. From here the tablet shows the PIN screen and stays in kiosk mode; it starts on its own after a restart.
- Mount the tablet, keep it plugged in, and hand the screen over to people with their PINs — see Clocking in on the tablet kiosk.
4. The exit password and unpairing
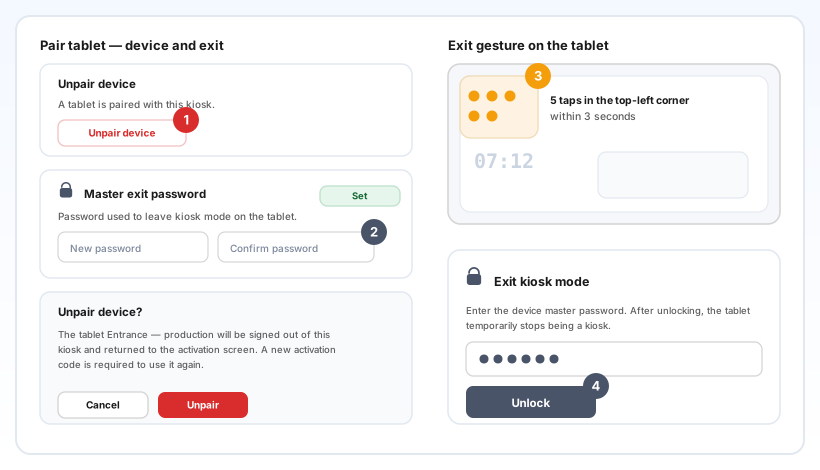
- Set the Master exit password in the same dialog, before you mount the tablet. Type it twice and click Set password; four characters is the minimum.
- The password is never shown back to you — the dialog only says Set or Not set. If it is lost, set a new one from here; there is nothing to recover.
- It is meant for you or a technician, not for staff. Do not write it on the tablet or the wall next to it.
- On the tablet, the way out of kiosk mode is a gesture with no visible button: five taps in the top-left corner within about three seconds. That opens the password sheet; Unlock releases the tablet so other apps become visible again. It works without internet.
- To take the tablet out of service, click Unpair device and confirm. The tablet is signed out on its next contact with the server and returns to the activation screen; a new code is needed to use it again.
- Unpair whenever a tablet is replaced, repaired or lost. Setting the device to Disabled instead only blocks clocking in — the pairing stays.
5. Deciding what the tablet shows
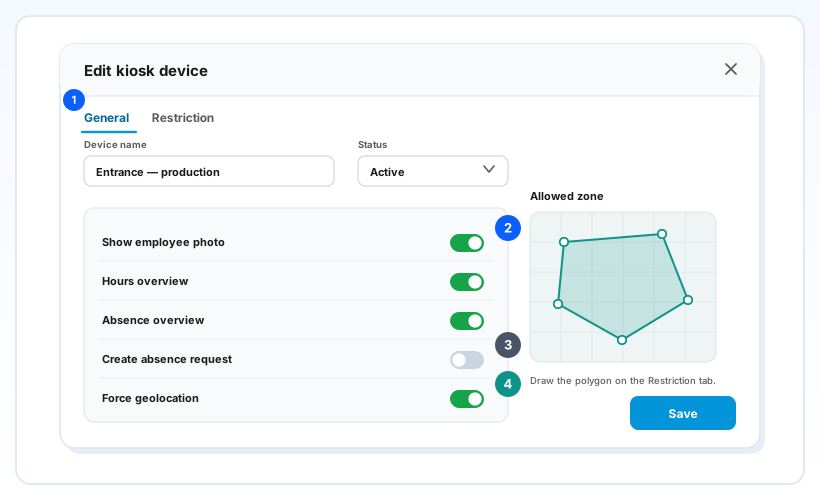
- Open Edit on the same device row. Everything the tablet shows comes from here — the app has no settings of its own.
- Show employee photo puts the person's photo on the screen after the PIN. It is the cheapest protection against people sharing PINs; without a photo they see their initials.
- Hours overview, Absence overview and Create absence request each add one button under the hour types. A switch that is off means the button is not drawn at all.
- Leave the extra buttons off on a busy gate and on where people have a moment — the decision is per device, so two tablets can differ.
- Force geolocation records the position of every start and stop. Combined with a zone on the Restriction tab it also blocks records made outside it.
- Draw the zone generously: positioning is accurate to metres, and a tight polygon around a building will refuse people standing at the door.
- Allow the location permission for InSync365 Kiosk in the tablet's own settings, and leave location switched on. Without it a device that requires location cannot record anything.
- Changes take effect on the tablet's next contact with the server — there is nothing to reinstall and no need to re-pair.
6. When something is wrong
- The tablet shows “This kiosk is disabled”. The device's status is Disabled. Set it back to active on the device row; the tablet recovers by itself, with no new code.
- The tablet shows “No connection to the server”. Check the Wi-Fi on the tablet. The screen clears itself as soon as the connection returns; hours cannot be recorded while it is showing.
- The tablet is back on the activation screen. Somebody unpaired the device, here or on another computer. Generate a new code and activate it again.
- “Device is outside the allowed area”. The device requires a location inside your polygon and reports a position outside it. Check the zone's size and that location is allowed and switched on for the app.
- A person's PIN is not recognised. That is the PIN, not the tablet. Issue or reissue their code on the employee list — see Clocking in at a kiosk.
- The device row shows the tablet is not connected. The pairing exists but the tablet has not been in touch. Check that it is powered, online and that the app is open.
The app runs on Android tablets only and is tablet-first, so a phone-sized layout is not offered. The tablet locks itself down properly (starts on its own after a restart, cannot be left) only when the device was prepared for kiosk use; otherwise the app works normally but the tablet can be exited like any other app — ask us if you want a tablet prepared that way. Records made on the tablet go into the ordinary timesheet with the device stamped on them, and appear on the same kiosk dashboard as the rest.
Related: Clocking in on the tablet kiosk · Setting up a kiosk device · Clocking in at a kiosk and the kiosk dashboard