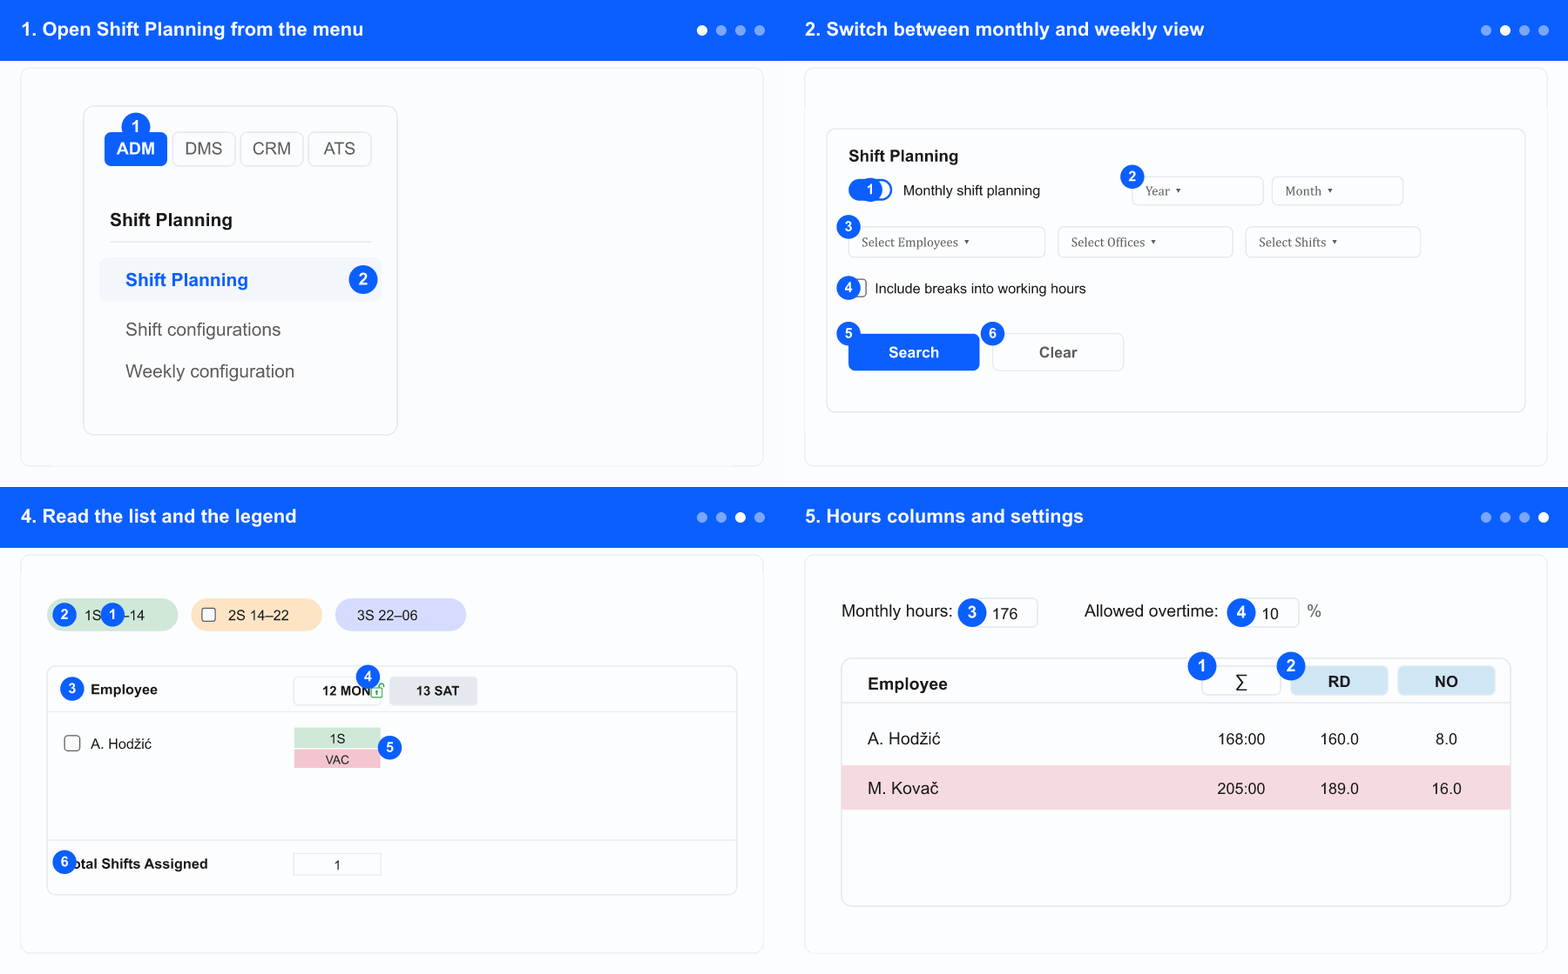
The Shift Planning screen shows who works which shift, day by day, for a whole month or a single week. This overview explains how to open the screen, switch views, filter the list, and read the layout and legend. The detailed tasks have their own guides: assigning shifts, absences, locking days, and approving the month. Labels follow your UI language; this page uses the product's English strings where available.
The whole flow at a glance (loops). Each step below explains one part.
1. Open Shift Planning from the menu
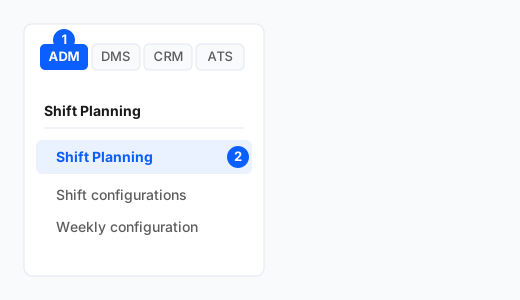
① Open the ADM tab · ② open the Shift Planning group and select Shift Planning.
In the left menu, open the ADM tab. The tabs (ADM / DMS / CRM / ATS) only appear when your company uses more than one module — otherwise the menu items show directly, so skip to the next step.
Open the Shift Planning group and select Shift Planning. The screen opens with the Shift Planning title.
Seeing a no access page means your role is missing the permission — contact a company administrator.
2. Switch between monthly and weekly view
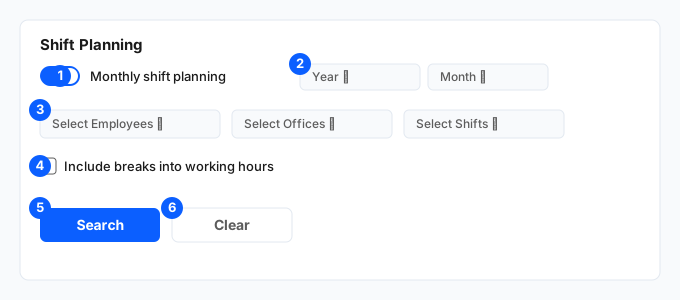
① view switch · ② year and month · ③ filters · ④ include breaks · ⑤ Search · ⑥ Clear.
Use the switch to choose Monthly shift planning or Weekly shift planning.
In monthly view, pick the year and month from the dropdowns.
In weekly view, move between weeks with the < and > buttons.
On a phone, pick a single date to focus on one day.
3. Filter the list and run the search
Use Show filters / Hide filters to expand or collapse the filter row.
Narrow the list with the multi-selects: Select Offices, Select Departments, Select Employees, Select Managers, Select Shifts, and Select Offices With Assigned Shifts.
Tick Include breaks into working hours if breaks should count toward the totals.
Click Search to load the list with your filters; Clear resets them.
4. Read the list and the legend
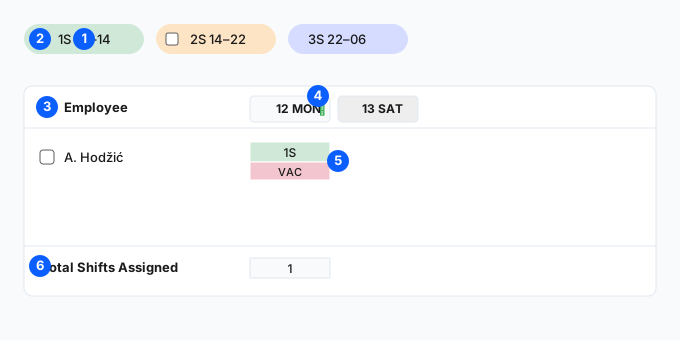
① shift chips · ② copy shift code · ③ employee + checkbox · ④ day header + padlock · ⑤ a day cell: shift on top, absence below · ⑥ totals rows.
Each shift chip in the legend shows a colour, code and (when hours are shown) the times. Use the copy icon to Copy Shift Code; +N More (or Shift List on a phone) reveals the rest.
The left column lists employees, each with a checkbox for bulk actions.
Day columns are headed by the date and weekday and a padlock showing whether the day is locked.
In a day cell the top band is the assigned shift; the bottom band is an absence/event. A robot icon marks shifts created from an automated weekly plan; weekends are shaded.
The bottom summary rows show Total Shifts Assigned, then counts per office and an Office not select row.
5. Hours columns and settings
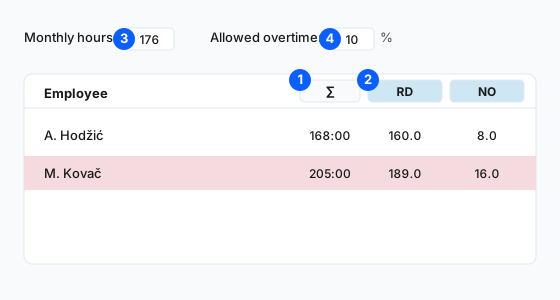
① ∑ total · ② hour types · ③ Monthly hours · ④ Allowed overtime.
When your role shows time details, the right side has a ∑ total per employee and a column per hour type.
Monthly hours (the norm) and Allowed overtime (%) can be adjusted; a row turns red when its total exceeds the norm plus the allowed percentage.
The Settings (gear) button opens the company hour-bucket rules (from/to hour, name, abbreviation, formula, absences). Change these only if you understand the effect on payroll. Settings is hidden for view-only roles.
6. Where to go next
Assign shifts — add, edit, delete, fast input, bulk assign, weekly plan and fill.