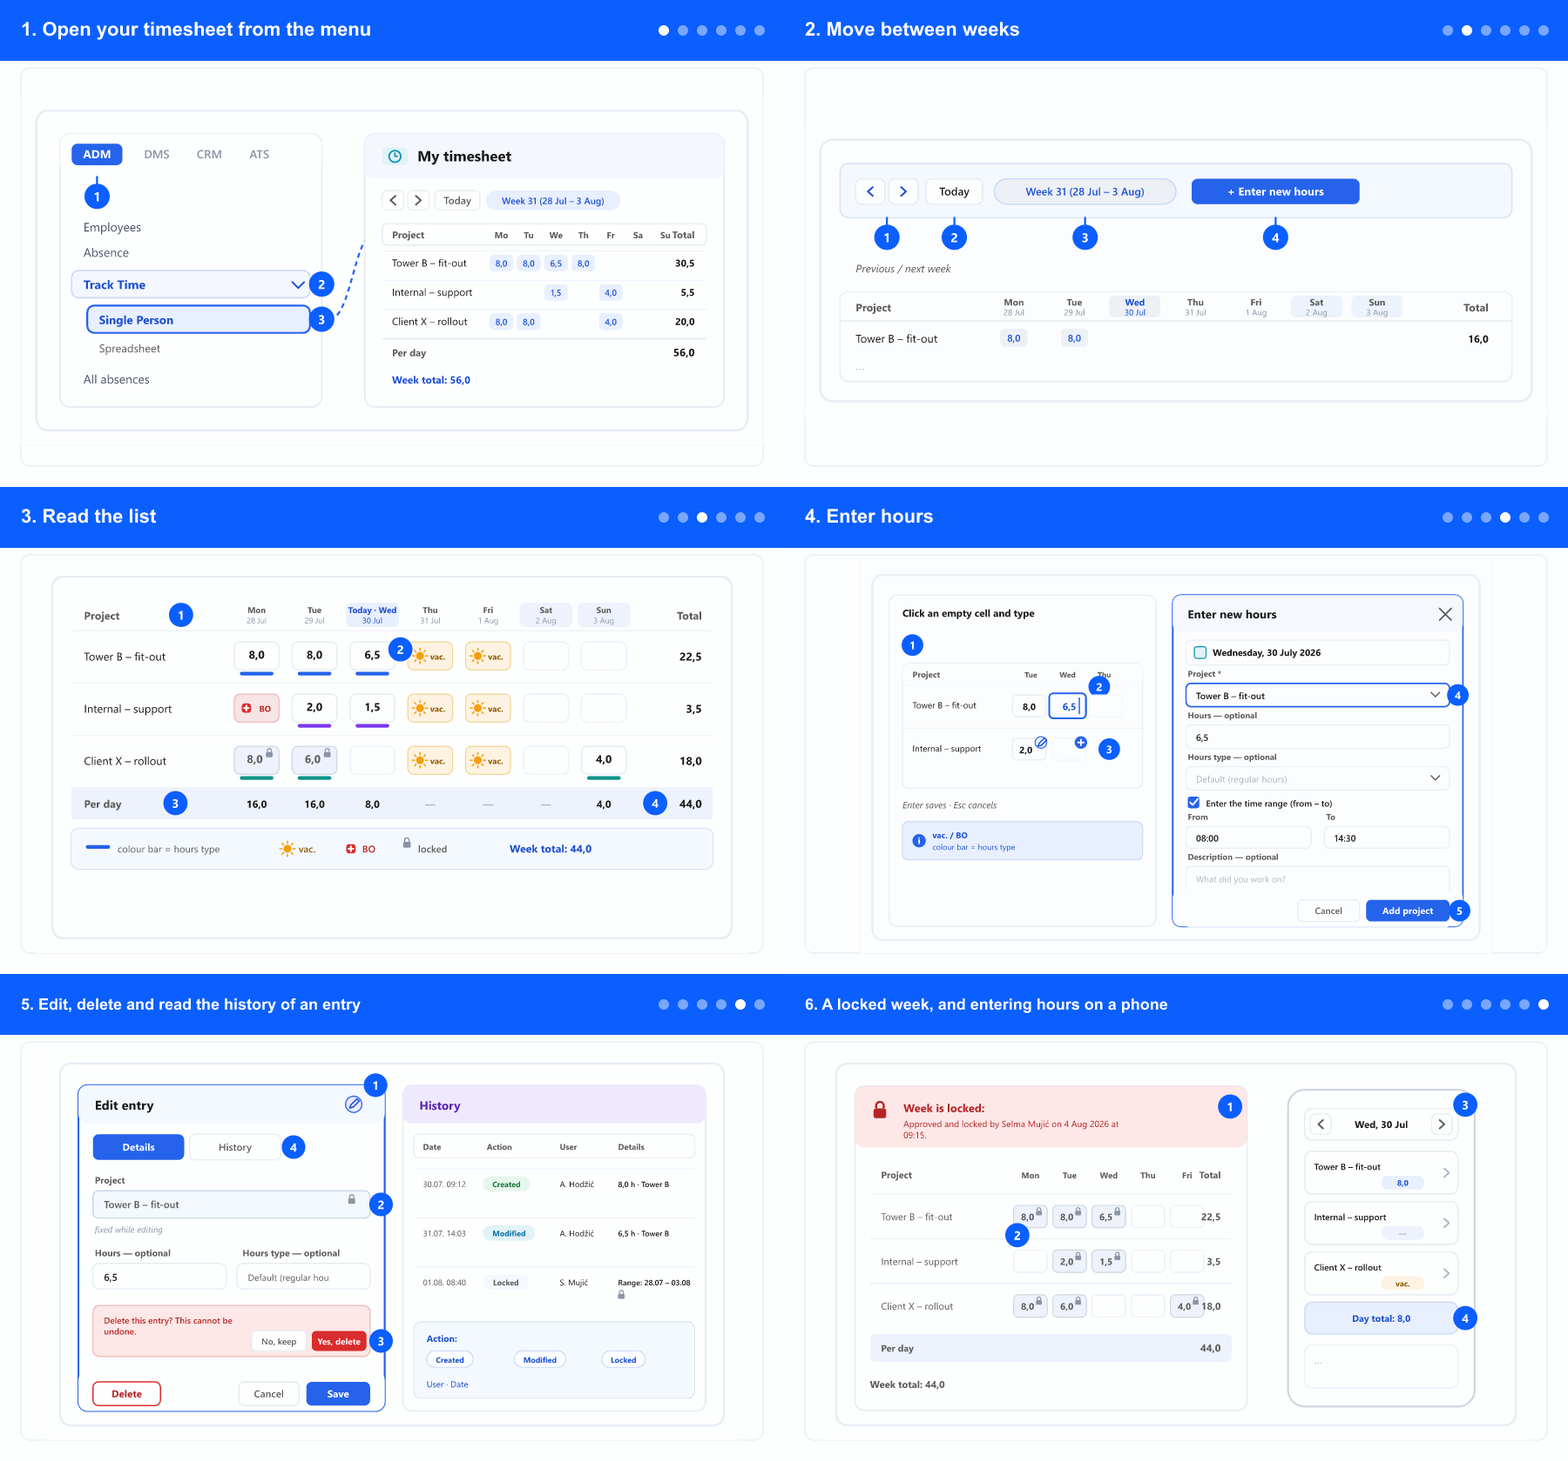
1. Open your timesheet from the menu
- In the left menu, open the ADM tab. The tabs (ADM / DMS / CRM / ATS) appear only when your company uses more than one module — otherwise the items are visible right away, so move on to the next step.
- Expand Track Time.
- Select Single Person. Your own week opens straight away.
- If Track Time has no items underneath it, your company does not use the Spreadsheet view — clicking Track Time takes you to this same screen directly.
- Don't see Track Time at all? Time entry is not switched on for your company — contact your company administrator.
2. Move between weeks
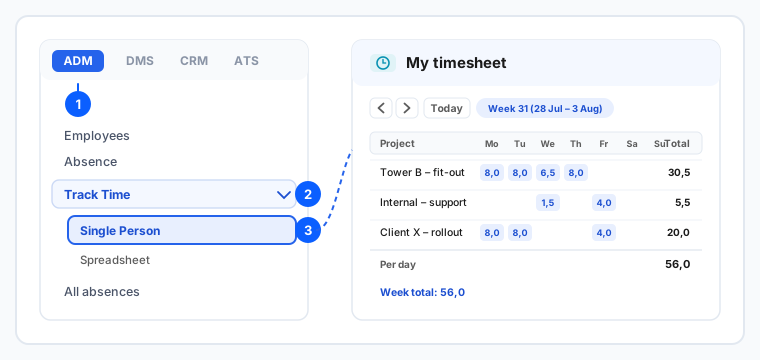
- The screen always opens on the current week, Monday to Sunday.
- Use ‹ and › to step one week back or forward. There is no limit — you can go back to earlier months.
- Click Today to jump straight back to the current week from wherever you are.
- The pill next to the buttons tells you which week is loaded, for example Week 31 (28 Jul – 3 Aug). Check it before you type — entering hours in the wrong week is the most common mistake.
- + Enter new hours opens the form described in step 4. It appears only when you have at least one project assigned and the week is not locked.
3. Read the list
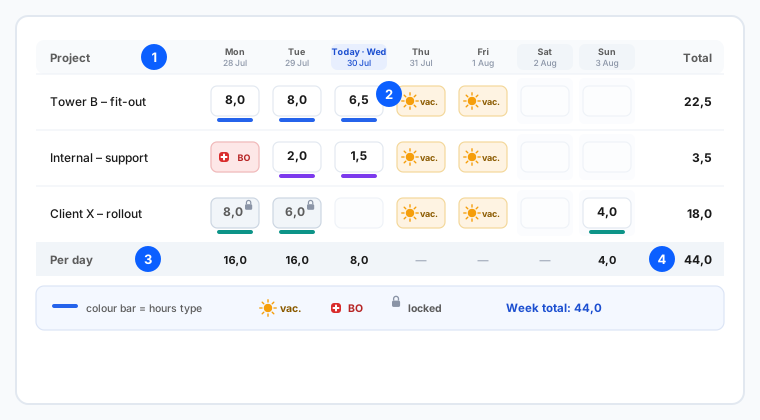
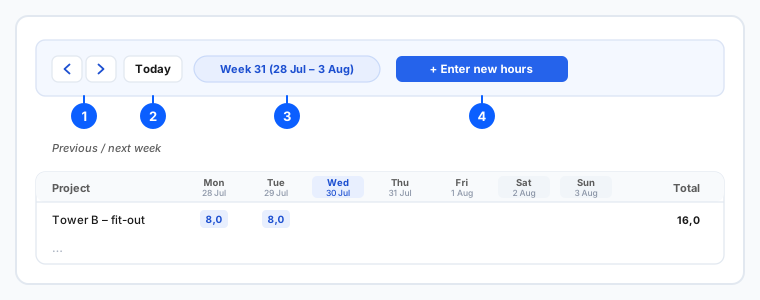
- Each row is one project you are assigned to; the seven columns are the days of that week. Today's column and the weekend are shaded so you can find them at a glance.
- A cell with hours shows the number and a thin colour bar underneath. The colour is the hours type (regular, overtime, and so on) — hover the cell to see the type and any description.
- Days you were on leave show vac. and days on sick leave show BO. These come from the absence module and cannot be edited here.
- A cell with a small padlock is locked — the hours have been approved and can no longer be changed.
- The Per day row at the bottom adds up every project for that day. The Total column on the right adds up the week per project, and the bottom-right figure is the week total.
- Two empty states are possible. No entries this week simply means you haven't logged anything yet. No projects assigned means there is nothing to log against — ask your project manager to add you to a project.
4. Enter hours
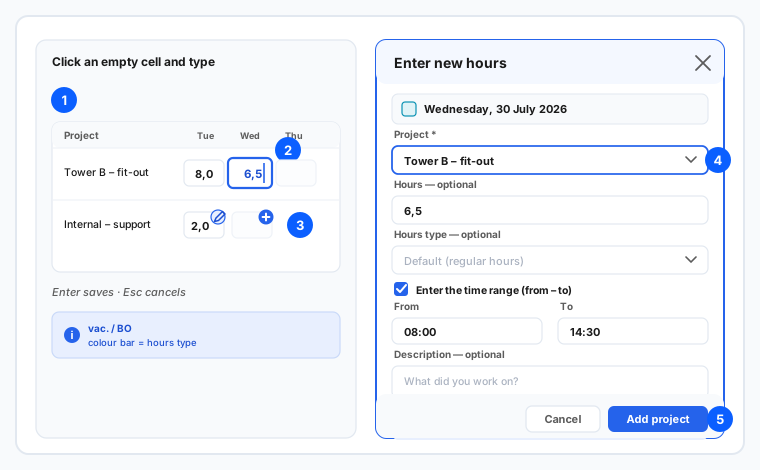
There are two ways in. Use the quick one for everyday entry and the form when you need the extra fields.
- Quick way — type into the cell. Click the cell where the project and the day meet, type the number of hours, and press Enter. Esc cancels. Decimals are allowed, so half an hour is 0,5 and six and a half hours is 6,5.
- Hours must be a number between 0 and 24. Anything else is refused with a short message and nothing is saved.
- Full way — use the form. Hover an empty cell and click the small +, or click + Enter new hours in the toolbar. The form opens with the day already filled in.
- Pick the Project — this is the only required field. If the project isn't in the list, you are not assigned to it for that week.
- Hours is optional: leave it empty to add the project to the week now and fill the days in later, straight in the list.
- Hours type is optional. Leave it as Default (regular hours) unless your company asked you to split overtime, night work and similar.
- Tick Enter the time range (from – to) if your company records start and end times. Then both From and To are required, and To must be later than From.
- Add a short Description of what you worked on if it is useful to whoever reviews the hours.
- Click Add project to save, or Cancel to close without saving.
- If the project is already a row in the list, the form asks for hours as well — adding the same project twice with nothing in it would create an empty duplicate row.
5. Edit, delete and read the history of an entry
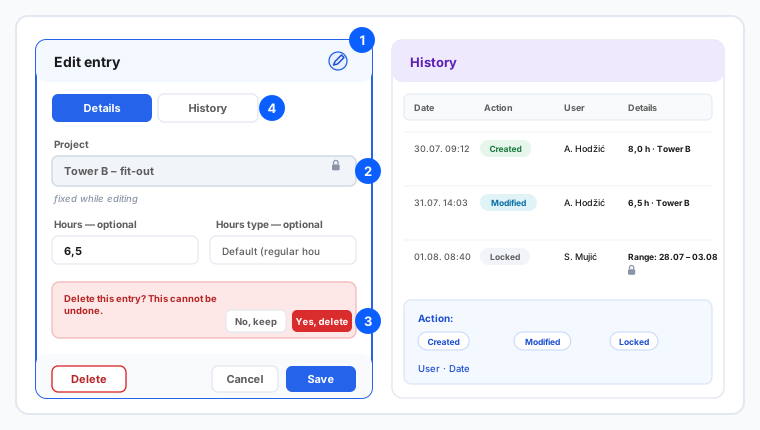
- Hover a cell that already has hours and click the small ✎ button. The entry opens in Edit entry mode with everything you filled in.
- Change the hours, hours type, time range or description and click Save.
- The Project is shown but cannot be changed while editing. To move hours to a different project, delete the entry and add it again on the right one.
- To remove an entry, click Delete. A confirmation appears in the form — choose Yes, delete or No, keep. Deleting cannot be undone.
- Clearing the hours field is not a way to delete: hours are required when saving, and the message tells you to use Delete instead.
- Open the History tab to see everything that happened to this entry: the date, the action (Original, Created, Modified, Deleted, Locked, Unlocked), who did it, and the details — the hours, project, hours type and description as they were at that moment.
- Lock and unlock events appear in the same history with the range of days they covered, so it is clear when the hours became read-only.
6. A locked week, and entering hours on a phone
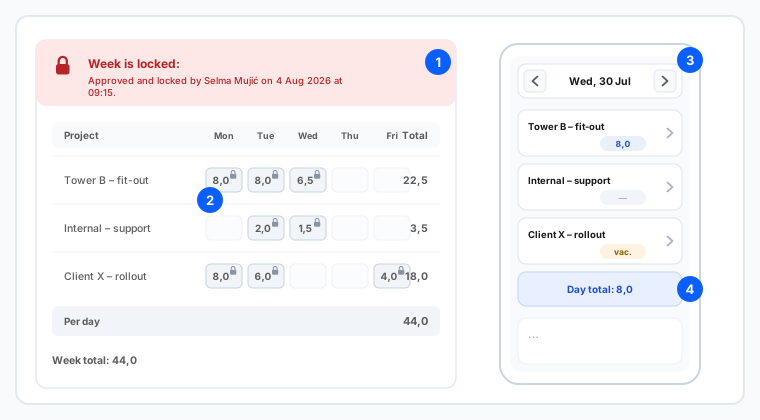
- When a manager approves a week it is locked. A banner appears at the top — Week is locked — and, when it is known, who approved it and when.
- While a week is locked you can still read everything, but nothing can be added, changed or deleted. The + Enter new hours button disappears.
- Need a correction in a locked week? Ask your manager to unlock it — you cannot unlock it yourself.
- Individual days can be locked on their own, so part of a week may be editable while the rest is not. Locked cells carry the padlock.
- On a phone the seven-column list becomes a single day. Use ‹ and › above the list to move from day to day.
- Each project is a row with a pill on the right: the hours, — when nothing is logged, or the leave marker. Tap the row to enter or change hours for that day.
- The bar at the bottom shows the day total, so you can check you reached your hours before moving on.
Which projects and hours types you see depends on your assignments and your company setup. Vacation and sick-leave days come from the absence module and are never edited on this screen. If a week or a day is locked, only someone with the right permission can unlock it.
Managing someone else's hours, approving and locking a week? See View, approve and lock another employee's hours. For the printed monthly record, see Detailed timesheet: print to PDF.